- What do you need a snoot for in food photography?
- What is a snoot?
- Which light quality produces a snoot?
- How you can use a snoot for your food photography?
- How you can modify a snoot’s light quality?
- A pro tip: You can make every light source hard or soft
- How can you use this for your food photography?
- Conclusion
What do you need a snoot for in food photography?
Let’s talk a bit about flash photography and a very special light modifier – the so-called snoot.
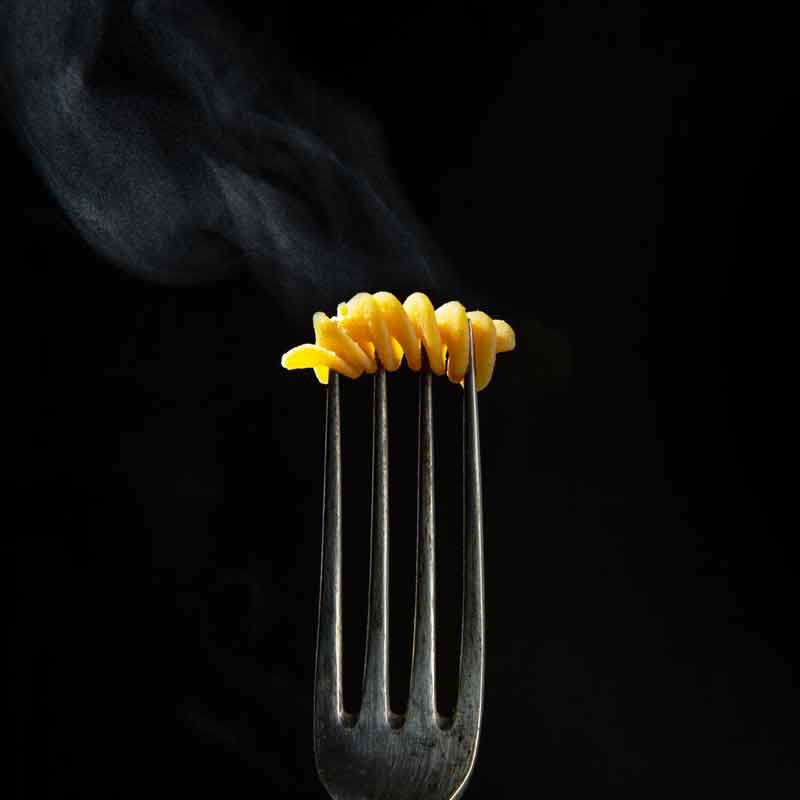
What can you do with it in food photography? Use a snoot to cast additional light on the food to make it stand out from the rest of the image.
Think of it as a spotlight in the theater when the main actor hits the stage. That’s how I use a snoot in my food photography.
That means you need at least two flashes in your setup. One as your key light and the snoot for some extra effect for your food. You can think of the snoot as the silver bounce card you use to put some extra fill light onto your meal in a daylight setup.
What is a snoot?
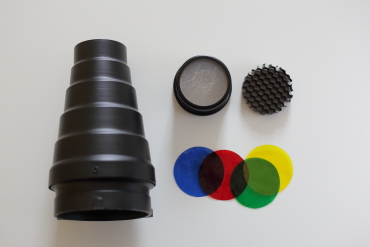
A snoot is a tubular and adaptable light modifier for any type of artificial light in photography. A snoot focuses light and allows a concentrated beam of light to be cast on a confined space, similar to a spotlight. Usually, it is used in front of a studio strobe or a portable Speedlite to give your main subject an extra kick of light to pop out.
A snoot should have a minimum of 200mm to have a good effect in front of your light source. Snoots can be perfect cylinders or often conical cylinders where the tapered end emits light. The tapered shape stops the light from spilling out sideways.
You have to watch out to use the right adapter for your studio system. The most universal and common mount in photography for strobe accessories is the Bowen mount, but maybe you are using a different system. Be aware and check it before you purchase a snoot and think about how to attach them to your light source.
The food should be always the star in your photography. A snoot can help you to let it shine.
For Speedlites, there are cheap Bowen mount adapters available on the market where you can stick your Speedlite on one end into the adapter and mount your snoot from the front side to it.
If you are shooting with Speedlites I can highly recommend them because they are inexpensive, very handy, and fit easily in nearly every bag.
As another recommendation get one adapter for each of your Speedlites. The adapters allow you to mount every kind of modifier with the same mounting system onto it.
This means you can now use snoot, different-sized softboxes, etc. onto your Speedlites. This makes your setup very easy and you now have nearly every choice you would have with studio strobes, but you are way more portable.
Which light quality produces a snoot?
By default, a snoot creates a very direct and bundled circle of light on your subject. Think of it as a spotlight. You have a very bright spot of light in its center with very little falloff and harsh shadows on the outside.
Do you maybe think now that’s exactly the kind of light quality we won’t have at a food shoot? The answer is yes and no.
Yes, you usually don’t want to use lights that produce hard light in food photography.
No, because if you know how to use it for your adaption in the scene it can work wonders.
How you can use a snoot for your food photography?
A snoot’s light is ideal for isolation a subject such as your food. So a typical setup for using a snoot is the following:
Just set up your main light – use a big octagonal box or a diffused standard reflector and build your scene. When you decided where to put your main focus point (your food or dish) you now set up your snoot. Just get it focused on your food.
The trick is to find the right power setting for your snoot. Too much light will cause the effect that your food will often look very odd, but don’t be shy to experiment on it.
Usually, everything between one and two stops over your basic exposure will do.
How you can modify a snoot’s light quality?
There are mainly three options you still have to modify your snoot.
Basically, you can try to make it even more direct and harsh with a honeycomb grid in front of your snoot.
Or you can try to do the exact opposite by attaching some kind of diffusion material in front of your snoot.
The third option is a kind of doing both at the same time: making your spotlight more direct, but smoothening the edges a bit with the diffusion.
The honeycomb grid is doing two things.
First, it allows you to cut the light output from your light source by allowing only just a smaller amount of very direct light onto your subject.
Second, it will create a light spot with nearly no spillage and a very harsh and precise falloff.
But what is diffusion gel making? That’s very simple: it just will soften and smoothen out the edges of your light.
I often use the combination of the honeycomb grid and the diffusion to blend the snoot’s light better into my scene.
A pro tip: You can make every light source hard or soft
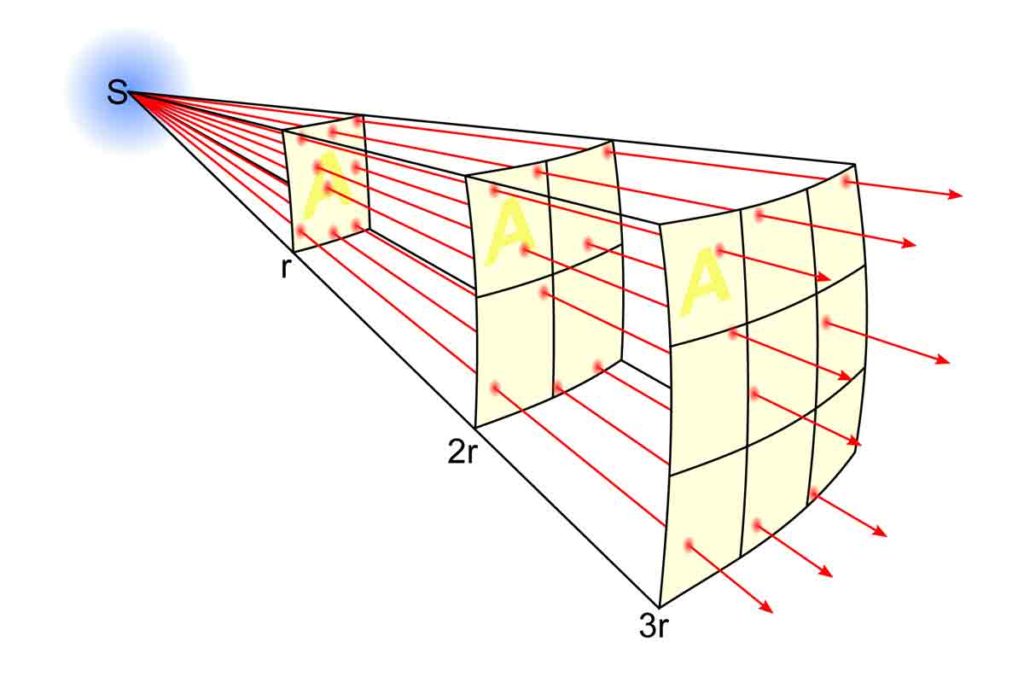
Remember: You can make every light source a hard or soft light. The trick is a matter of distance.
Depending on the inverse-square law in physics the light intensity is inversely proportional to the square of the distance from your subject.
Copyright CC BY-SA 3.0
What does that mean: It means that your light loss between 1 meter and 2-meter distance from your light source will be a fourth means you get only 25% of the light intensity at the 2-meter benchmark. At 3 meters you are getting only 11% of the light, at 4 meters you get only 6,25%, and so on.
How can you use this for your food photography?
It’s very simple. As far away your light source is from your subject as softer the light will be.
If, for example, a spotlight is far away from your scene it will turn into a much softer and more diffused light and the spot will get bigger by dragging it away from your scene.
So you can create a soft light with even a hard light source, BUT there is a big light loss in doing that depending on the inverse-square law.
Usually, it’s a better idea to put some kind of diffusion in front of your light if your goal is to soften it. Depending on what kind of diffusion you are using you will lose light too.
But knowing that you can change the quality and intensity of light just by pulling your light back. Often that’s a good option to have in mind and can sometimes do the trick. For sure, you will find a use for that one day.
The same trick can be reversed. If you have very soft light, bring it very close to your subject and it will turn into an ugly harsh light. Sometimes knowing this is useful too to adjust your light.
Conclusion
A snoot can give you that extra light kick on your food or dish which is needed to let it shine.
You can modify it by using a honeycomb grid to get an even more direct spotlight with hard edges.
Or you can use a diffusion gel in front of it to soften the light and to get the falloff softer as well.
Of course, you can combine both methods if needed. Remember that the distance to your subject will define how big or how small your spot will be.
Watch out to blend the kicking light probably with your overall lighting setup so that it matches perfectly. If you are working with portable flash units like Speedlites you can use an adapter to get your snoot attached to it.
In the end, it needs some practice to unfold the possibilities of a snoot. So start today and not tomorrow. Happy cooking and shooting.
If you have any questions about it or other lighting issues feel free to get help in the forum.
Cheers,

HOW TO USE A SNOOT FOR FOOD PHOTOGRAPHY was written by EasyFoodPhotography founder and editor Alex Fuchs. Alex loves photography and good heavy stoner rock music. His food styling skills are restricted, but he is working on that. When people approach him saying “You can’t do that” his maxim is always: I’ll do it in a minute. He loves to be challenged. Follow his Instagram feed. You read “How to use a snoot for food photography”.

THIS STORYTELLING TECHNIQUE WILL CHANGE YOUR FOOD PHOTOGRAPHY FOREVER
HOW TO START FOOD PHOTOGRAPHY

10 WAYS TO GET BACKDROPS FOR FOOD PHOTOGRAPHY IN 2022
FOOD STYLING BASICS

HOW TO TURN ANY LENS INTO A MACRO LENS FOR FOOD PHOTOGRAPHY
WHY SHOOTING TETHERED WILL IMPROVE YOUR FOOD PHOTOGRAPHY
PLANNING & PREPPING YOUR FOOD GIG LIKE A PRO
THE CHALLENGES OF BECOMING A FOOD PHOTOGRAPHER
CREATING AWESOME FLAT LAYS IN NO TIME
33 MUST-HAVES FOR FOOD PHOTOGRAPHY IN 2022 THAT COST NEARLY NOTHING
HOW TO START FLASH FOOD PHOTOGRAPHY
15 THINGS YOU CAN DO TODAY WHICH WILL CHANGE YOUR FOOD PHOTOGRAPHY FOREVER
HOW TO ACCESS 10K PROPS FOR FREE

15 HACKS WHICH CHANGE YOUR INSTA FOREVER